With today being the last day of August, it practically means the summer is over. And with that, all the summer projects I wanted to complete and didn’t.
Okay, so really, it isn’t the end of the world. I can always still do a majority of these projects, if not all of them. But, I had set a goal to finish them this summer and I think we got one out of a dozen things finished. Why summer? Simply put, they were projects that would require being outdoors or we would need to spend more time outside due to the nature of the project. Still, all is not lost, and other projects were added to the list due to necessity, which in turn, probably would have cancelled out some of the other projects anyway.
There were some things at the top of the list I really wanted to get done: paint our bedroom; paint, tile and put in a new shower surround in the main bathroom; replace the broken windows; thoroughly clean out the rock garden of weeds and trim the plants as needed; put in a shed in the backyard; clean out the garage; gravel the side driveway; put the gutters on the chicken coop. Hmm… it looks like the things at the top of my list are, well, everything left to do on the list. At least we got our closet cleaned out and clothes garage saled or Goodwilled.
Of course, other projects took precedent. Our roof, for instance, on the south side of our house has had a few issues now for a few years. The main issue being that because there was no flashing between the gutters and the roof rain would get between the crack and eventually rotted the wood, including the plywood under the shingles, the facia and soffet. The gutter nails weren’t even attached to anything in the center stretch and were barely hanging on from either end. Fortunately we have a roofer friend who helped my partner fix that issue and we paid him in imported Jamaican beer, which was our only cost along with the materials required. This project alone took up a majority of our nonexistent budget, as we could have replaced both windows and painted our bedroom with that money. Not that we necessarily would’ve gotten around to doing either of those things, but still, it was spendy and had to be done. If for no other reason than to get rid of the rampant bird population living in that portion of the house.
Alas, while the summer is not really over, perhaps there is still time to get a couple of the outdoor things off the list. I know putting the gutters on the chicken coop will be rather quick once we get a downspout for it, and with the cooler weather, it might be easier to clean out and trim the rock garden, so perhaps there is still some time after all to cross a few more items off my summer to-do list.
Showing posts with label home improvement. Show all posts
Showing posts with label home improvement. Show all posts
Tuesday, August 31, 2010


Friday, July 30, 2010
Roof: Part 1
For a few years now we’ve had a hole in our roof that eventually led to a much larger issue of rot until the gutter wasn’t attached to anything. A few days ago my partner decided to do something about it.
Sometimes the advantages and disadvantages of home ownership seem to be warring with each other. If we were still renting this house this wouldn’t be our problem to solve. Of course, if we were still renting we wouldn’t have been able to do a lot of things we’ve done over the years. So when my partner decided to take a closer look at the damage to the roof by prying apart the soffit where we first noticed a hole, a fairly good indicator of water damage, my first thought was, “Don’t go too far, we can’t afford this.” However, walking outside a few minutes later to find what looked like a demolition site, I literally bit my tongue as I saw just how much this was going to cost someone else to fix, because this was more work than we could possibly do ourselves without the know-how to do it. Literally biting my tongue until I drew blood, I simply walked back into the house.
A couple hours later my partner informed me that one of our friends, who happens to be a roofer, will be by in a couple days to help fix the damage. While this was a minor relief, there was still the cost of supplies to contend with. The fact that he said he’d work for beer was major relief as beer is cheaper than labor, even the imported microbrews he drinks.


Sometimes the advantages and disadvantages of home ownership seem to be warring with each other. If we were still renting this house this wouldn’t be our problem to solve. Of course, if we were still renting we wouldn’t have been able to do a lot of things we’ve done over the years. So when my partner decided to take a closer look at the damage to the roof by prying apart the soffit where we first noticed a hole, a fairly good indicator of water damage, my first thought was, “Don’t go too far, we can’t afford this.” However, walking outside a few minutes later to find what looked like a demolition site, I literally bit my tongue as I saw just how much this was going to cost someone else to fix, because this was more work than we could possibly do ourselves without the know-how to do it. Literally biting my tongue until I drew blood, I simply walked back into the house.
A couple hours later my partner informed me that one of our friends, who happens to be a roofer, will be by in a couple days to help fix the damage. While this was a minor relief, there was still the cost of supplies to contend with. The fact that he said he’d work for beer was major relief as beer is cheaper than labor, even the imported microbrews he drinks.

And so work started on the project yesterday, with even more tear down and a trip to the hardware store to pick up supplies. The only thing we still had was the primer and paint from a previous repair project we tackled a few years ago to fix a similar, albeit much small, problem on another section of the soffit. While I was busy baking and decorating a cake, my partner and friend were busy repairing the roof. They got a lot accomplished yesterday before calling it quits, and hopefully by Saturday when work resumes it will be complete. I just hope they don’t find anything else that needs to be fixed in the process!

Wednesday, May 26, 2010
The Cupboard Less Opened
Six cupboards diverged in a small kitchen
And sorry I could not open all…
Especially that one above the refrigerator
Robert Frost would be so proud. Okay, so, here’s the deal. I decided to replace the hinge on the broken cupboard above the stove that gets used multiple times a day with the one above the refrigerator which I thought hadn’t been opened in about a year. Turns out not only was that estimate off, but also the contents of the cupboard itself too. Apparently we did get rid of the two sets of extra dishes we had stored in there, probably a garage sale or something, and it’s been years since we had one of those. What is currently residing is a lot of old serving plates and our plastic picnic plates, as well as a margarita set of glasses and a pitcher. But more frightening than anything is the half bottle of rum lying in there along with three unopened drink mixes. This made me realize that it has been many years since this cupboard was opened because since we got our shelving unit in the kitchen four years ago our alcohol has been stored on the top in a cocktail tray.
I laughed a hearty laugh, mostly at the bottle of Monarch Rum, a brand I have never even drank which means that it was from before I started drinking, which furthermore means is over five years old. I nearly vomited at the crustified particles that had sunk to the bottom of the drink mixes, but was too horrified to touch them and so I left them lying there on their sides next to the margarita glasses.
But, I had a job to do and I needed to do it. The mission was to take one of the hinges off the right door of the cupboard where nobody would notice it missing and put it onto the one above the stove so that it could be hung back up. This was fairly simple, although I did notice that the left cupboard door above the stove was a little bent out of shape and I’m not exactly sure how to go about fixing that short of taking it off and rebending the hinge to make it square again, which of course I haven’t done yet but will need to do in the near future.
Now a logical person after hanging the door back up and knowing full well that there was stuff that needed to be thrown away in the other cupboard would have taken out said stuff and tossed it. I am not that person. Instead I closed the door, put the canvas storage bins back in front of the cabinet and focused instead on being able to open and close the door above the stove without it trying to impale me to death or take out an eye. However, after writing this now I have guilt for not cleaning it out and will probably end up doing so after I post this. Stupid conscience.
And sorry I could not open all…
Especially that one above the refrigerator
Robert Frost would be so proud. Okay, so, here’s the deal. I decided to replace the hinge on the broken cupboard above the stove that gets used multiple times a day with the one above the refrigerator which I thought hadn’t been opened in about a year. Turns out not only was that estimate off, but also the contents of the cupboard itself too. Apparently we did get rid of the two sets of extra dishes we had stored in there, probably a garage sale or something, and it’s been years since we had one of those. What is currently residing is a lot of old serving plates and our plastic picnic plates, as well as a margarita set of glasses and a pitcher. But more frightening than anything is the half bottle of rum lying in there along with three unopened drink mixes. This made me realize that it has been many years since this cupboard was opened because since we got our shelving unit in the kitchen four years ago our alcohol has been stored on the top in a cocktail tray.
I laughed a hearty laugh, mostly at the bottle of Monarch Rum, a brand I have never even drank which means that it was from before I started drinking, which furthermore means is over five years old. I nearly vomited at the crustified particles that had sunk to the bottom of the drink mixes, but was too horrified to touch them and so I left them lying there on their sides next to the margarita glasses.
But, I had a job to do and I needed to do it. The mission was to take one of the hinges off the right door of the cupboard where nobody would notice it missing and put it onto the one above the stove so that it could be hung back up. This was fairly simple, although I did notice that the left cupboard door above the stove was a little bent out of shape and I’m not exactly sure how to go about fixing that short of taking it off and rebending the hinge to make it square again, which of course I haven’t done yet but will need to do in the near future.
Now a logical person after hanging the door back up and knowing full well that there was stuff that needed to be thrown away in the other cupboard would have taken out said stuff and tossed it. I am not that person. Instead I closed the door, put the canvas storage bins back in front of the cabinet and focused instead on being able to open and close the door above the stove without it trying to impale me to death or take out an eye. However, after writing this now I have guilt for not cleaning it out and will probably end up doing so after I post this. Stupid conscience.
Tuesday, May 25, 2010
Honey-Do Lists
Do you ever wake up and open the cupboard door where the coffee is stored and have the door fly off the hinges and nearly impale you? If not… lucky.
So our kitchen cabinets are old, I mean as old as the house anyway which was built in 1956. Furthermore the hinges are all the original brass hinges with the exception of the ones under the sink which have been replaced at least four times since we moved in. I don’t know, I guess they get a lot of use, or perhaps my kicking them shut and using my foot to open them isn’t the most gentle of things to do.
Well, let’s see, Sunday morning I wake up, shower, get dressed, feed the animals and open the cabinet to get the coffee canister and filters and the top hinge had apparently been compromised because the door almost took out an eye. I like my eyes and would hate for anything to happen to them. So what would the next logical step be? Remove the cabinet before it takes out someone else’s eye? You’d think, but instead I made my coffee, put it back into the cabinet and carefully propped the door back up and made sure the little magnet (also over fifty years old) secured it into place. Monday morning was a repeat of nearly taking out an eye, but this time I grabbed a screw driver and took the door off and placed it next to the stove. This made me realize two things: I really do like not being able to see what is behind the cabinet door; I really have to clean out this cabinet yet again.
Then upon further inspection, I believe I do not necessarily have to get a new hinge, but merely take one of the hinges off of one of the cabinet doors above the refrigerator which haven’t been opened in over a year. There isn’t much in there we use anyway, since we don’t entertain nearly enough to need more than four martini glasses, four margarita glasses (both of which work interchangeably), eight cocktail glasses (which also work for both margaritas and martinis), six pub glasses and who knows how many wine and champagne glasses we have in the cupboard we store our glasses and mugs in. The one over the fridge is more of the same, along with two sets of dishes we really should just get rid of. I figure they are short enough that one hinge should in theory be all that is required to keep it in place. If not, I’ll find another at a local hardware store and pray that it will fit in the same place, which has been the main issue with the sink cabinet as is evident in the multitude of holes next to, above and below the current hinges.
Of course, the biggest issue is when I will decide to go ahead and take care of this. Something tells me it’ll be sooner than later as I really hate looking at the nutritional information on the sides of our cereal boxes, especially the one for Cap’n Crunch.
So our kitchen cabinets are old, I mean as old as the house anyway which was built in 1956. Furthermore the hinges are all the original brass hinges with the exception of the ones under the sink which have been replaced at least four times since we moved in. I don’t know, I guess they get a lot of use, or perhaps my kicking them shut and using my foot to open them isn’t the most gentle of things to do.
Well, let’s see, Sunday morning I wake up, shower, get dressed, feed the animals and open the cabinet to get the coffee canister and filters and the top hinge had apparently been compromised because the door almost took out an eye. I like my eyes and would hate for anything to happen to them. So what would the next logical step be? Remove the cabinet before it takes out someone else’s eye? You’d think, but instead I made my coffee, put it back into the cabinet and carefully propped the door back up and made sure the little magnet (also over fifty years old) secured it into place. Monday morning was a repeat of nearly taking out an eye, but this time I grabbed a screw driver and took the door off and placed it next to the stove. This made me realize two things: I really do like not being able to see what is behind the cabinet door; I really have to clean out this cabinet yet again.
Then upon further inspection, I believe I do not necessarily have to get a new hinge, but merely take one of the hinges off of one of the cabinet doors above the refrigerator which haven’t been opened in over a year. There isn’t much in there we use anyway, since we don’t entertain nearly enough to need more than four martini glasses, four margarita glasses (both of which work interchangeably), eight cocktail glasses (which also work for both margaritas and martinis), six pub glasses and who knows how many wine and champagne glasses we have in the cupboard we store our glasses and mugs in. The one over the fridge is more of the same, along with two sets of dishes we really should just get rid of. I figure they are short enough that one hinge should in theory be all that is required to keep it in place. If not, I’ll find another at a local hardware store and pray that it will fit in the same place, which has been the main issue with the sink cabinet as is evident in the multitude of holes next to, above and below the current hinges.
Of course, the biggest issue is when I will decide to go ahead and take care of this. Something tells me it’ll be sooner than later as I really hate looking at the nutritional information on the sides of our cereal boxes, especially the one for Cap’n Crunch.
Friday, May 7, 2010
Half Bath Renovation: Now What?
With the half bathroom fairly finished now, it looks, well, empty. At least the floor is pretty to look at, right?
I finally broke down and applied Liquid Nails to the back of the sink and pressed it against the wall, still resting on both the pedestal and metal wall piece from the previous sink. After making sure it wasn’t going anywhere I caulked around the sides and top where the sink meets the wall to prevent any water damage that may occur from splashing. Now I just have to get the paint out again and paint the sections where the old sink was and the new sink doesn’t cover and the walls will be completely painted.

However, now the dilemma has become what to do with décor. When the room was filled with Looney Tunes characters it had “art” and a cohesive look, but with all of those painted over in a solid color, the room feels naked. I’m not saying I want to cover everything up in clutter and make it a clusterflust-of-conglomerate-crap, just that it needs a few things to make it looked finished. You know, like maybe a large picture, a cabinet above the toilet and a candle or small houseplant.


I finally broke down and applied Liquid Nails to the back of the sink and pressed it against the wall, still resting on both the pedestal and metal wall piece from the previous sink. After making sure it wasn’t going anywhere I caulked around the sides and top where the sink meets the wall to prevent any water damage that may occur from splashing. Now I just have to get the paint out again and paint the sections where the old sink was and the new sink doesn’t cover and the walls will be completely painted.

However, now the dilemma has become what to do with décor. When the room was filled with Looney Tunes characters it had “art” and a cohesive look, but with all of those painted over in a solid color, the room feels naked. I’m not saying I want to cover everything up in clutter and make it a clusterflust-of-conglomerate-crap, just that it needs a few things to make it looked finished. You know, like maybe a large picture, a cabinet above the toilet and a candle or small houseplant.

I picked up a glass shelf to go above the sink, but I think where it would be placed and the placement of the medicine cabinet will inhibit most of its function, not to mention get in the way of the faucet. Then I thought that a small corner shelf on the wall between the sink and door would work to hold hand soap, but haven’t found anything that I like that matches those criteria. And then there is the wall cabinet for above the toilet, which apparently what I have in my head that I want and what is available on the market are two very different things. I mean, we don’t want anything huge, just something large enough to hold a few towels and some toilet paper and not look like a ghetto melamine covered piece of glued sawdust and paperboard. And while sitting on the toilet, it would be nice to have some artwork to look at, but the sicko in me also thinks a full length mirror would be hilarious!

But for now the walls remain bare and there is nowhere to place a soap dispenser and there isn’t even a trash can on the floor. I’m sure we’ll find some things that will work, but in the meantime I keep looking at the floor and cursing the rest of the room for not looking as good as it.

Friday, April 30, 2010
Half Bath Renovation: Where We’re At
I know I haven’t blogged the progress of the half bathroom in a while. I decided it was best to step back from the project for a bit to prevent harm to both myself and others.
On a good note, we have a functional, working second bathroom in the house. It has a toilet that flushes and surprisingly fits into this small space. It has a sink that both runs water from the hot and cold faucets and drains without said water bursting from the pipes onto the beautiful slate floor which is completely grouted and sealed and looks fabulous.
Yes, there have been setbacks, mainly the sink which I am convinced simply doesn’t want to live at our house and is sabotaging every one of my efforts to properly install it, but I tried to push through them so that we could decide whether or not we wanted to slate the rest of the linoleum floors and vinyl tile floors. On that issue I am quite certain a resounding yes is the answer.
However I must admit I have trepidations about removing the sink in the other bathroom after the horrifying ordeal with the one I installed in the half bath. After the bolt to secure the sink to the wall snapped in half, I decided to get the metal wall piece the previous sink was attached to and use that to keep the sink in place, which of course couldn’t just go back where it was before because the new sink is about four inches higher than the old one because it was obviously put in for little people. The only problem now is that the water line has, well, some leak issues that need to be resolved while in the off position, so removing the hose that connects it to the sink means removing the hose and letting the dribble happen. I grabbed a towel, figuring it would only take a minute to screw the plate into place and began to loosen the hose from the water line, immediately getting sprayed with a massive about of water escaping the line which was too much for the towel as it was sopping wet. At least I got to test out the sealant on the slate tile which works great, right? I triple checked the valve to make sure it was in the off position, which, by the way, yes it was, and quickly reconnected the hose to prevent flooding the house. Putting everything somewhat in place, I turned the faucet on while the valve was off and it was gushing as if on full blast. To double check that there wasn’t a surge in water pressure causing the water line valve to fail, I tested the hot water, and only a drip every couple seconds came out, which is normal for our house with the valves off.
Great, so now I have a sink that won’t stay in place and a water line that has been compromised. I decide to simply hold the sink with my body while screwing the metal plate to the wall, which by the way was no easy task as the hoses were still connected to prevent water damage so I couldn’t use a power drill, which yes, I did try to fit but there physically wasn’t enough space between the furthest point I could move the sink and the wall and I had to use a miniature screw driver with a big head that I am so glad we have. After the metal plate was completely installed, I moved the pedestal back to approximately where it was and slightly lifted the sink over it and into the drain pipe which, I am quite convinced, is where a third or fourth hand would have come in super handy. With everything set, I put the only good bolt back into the wall and tightened it into place and test out the sink’s stability and watch as the bolt wiggles out of the wall and onto the floor. I screamed various obscenities then decided to just walk away. I’d fixed the leaky drain issue, which stemmed from not having tightened the sink drain to the pipe enough and the sink was mostly secure. The only thing really I had to do was caulk around the toilet, so I did that and walked away from the whole matter until I could look at that damned sink and not think of plotting its demise.
On a good note, we have a functional, working second bathroom in the house. It has a toilet that flushes and surprisingly fits into this small space. It has a sink that both runs water from the hot and cold faucets and drains without said water bursting from the pipes onto the beautiful slate floor which is completely grouted and sealed and looks fabulous.
Yes, there have been setbacks, mainly the sink which I am convinced simply doesn’t want to live at our house and is sabotaging every one of my efforts to properly install it, but I tried to push through them so that we could decide whether or not we wanted to slate the rest of the linoleum floors and vinyl tile floors. On that issue I am quite certain a resounding yes is the answer.
However I must admit I have trepidations about removing the sink in the other bathroom after the horrifying ordeal with the one I installed in the half bath. After the bolt to secure the sink to the wall snapped in half, I decided to get the metal wall piece the previous sink was attached to and use that to keep the sink in place, which of course couldn’t just go back where it was before because the new sink is about four inches higher than the old one because it was obviously put in for little people. The only problem now is that the water line has, well, some leak issues that need to be resolved while in the off position, so removing the hose that connects it to the sink means removing the hose and letting the dribble happen. I grabbed a towel, figuring it would only take a minute to screw the plate into place and began to loosen the hose from the water line, immediately getting sprayed with a massive about of water escaping the line which was too much for the towel as it was sopping wet. At least I got to test out the sealant on the slate tile which works great, right? I triple checked the valve to make sure it was in the off position, which, by the way, yes it was, and quickly reconnected the hose to prevent flooding the house. Putting everything somewhat in place, I turned the faucet on while the valve was off and it was gushing as if on full blast. To double check that there wasn’t a surge in water pressure causing the water line valve to fail, I tested the hot water, and only a drip every couple seconds came out, which is normal for our house with the valves off.
Great, so now I have a sink that won’t stay in place and a water line that has been compromised. I decide to simply hold the sink with my body while screwing the metal plate to the wall, which by the way was no easy task as the hoses were still connected to prevent water damage so I couldn’t use a power drill, which yes, I did try to fit but there physically wasn’t enough space between the furthest point I could move the sink and the wall and I had to use a miniature screw driver with a big head that I am so glad we have. After the metal plate was completely installed, I moved the pedestal back to approximately where it was and slightly lifted the sink over it and into the drain pipe which, I am quite convinced, is where a third or fourth hand would have come in super handy. With everything set, I put the only good bolt back into the wall and tightened it into place and test out the sink’s stability and watch as the bolt wiggles out of the wall and onto the floor. I screamed various obscenities then decided to just walk away. I’d fixed the leaky drain issue, which stemmed from not having tightened the sink drain to the pipe enough and the sink was mostly secure. The only thing really I had to do was caulk around the toilet, so I did that and walked away from the whole matter until I could look at that damned sink and not think of plotting its demise.
Saturday, April 24, 2010
Half Bath Renovation: The Sink Gods Hate Me
Do you ever start a project with a great feeling that this will go pretty smooth? This was just that project, but then everything began to go horribly wrong.
Figuring that I should avoid the hose issue that I had with the toilet, I went back to the hardware store and picked up two faucet hoses. With everything else ready to go, I went about disconnecting the sink from the wall. Basically it is being held up by a fairly thick piece of metal with a bent curve screwed into the wall into what I would assume to be wood. It also seems to be in place by shifting some of its weight onto the pipes it also rests upon, which with metal pipes I’m sure isn’t that big of an issue and certainly not something you’d want to try using plastic. Now, from turning off the water line and opening the faucets I knew that the cold water had a minor drip, about one every three seconds, which for our house is pretty good for a shut-off valve. But it wasn’t until I disconnected the hoses that I realized the extent of this drip, which I anticipated with a towel and pitcher, which, let’s just say, wasn’t enough. I decided to connect the new hoses quickly, hoping it would alleviate some of the water seepage, but the pitcher was quickly overwhelmed and I had to grab my 12 quart stock pot to perform its duty of keeping water from getting all over our beautiful slate floors.

Using our handy stud finder, I found that the entire area was solid behind the wall. Excellent, right? So I used the drill to pre-drill holes into place and figured that if the stud finder was wrong the sink also came with drywall clamping screws as well, which meant that either way I’d by fine. The first hole I drilled started out fine, but quickly went right through the drywall, which I figured the stud must be right next to it, and so I grabbed the 5/8 inch drill bit and began boring out a larger hole… until it hit wood. What the heck? I removed the drill bit to discover that right where I needed the hole to be was smack in the middle of two not so butted up 2x4s. I put the screw between them in the gap and found that it was tight enough to hold and figured that’d be good enough, the pedestal will carry most of the weight anyway. The stock pot was full, so I dumped it in the kitchen sink as the utility sink next to the bathroom was full of stuff. Then I focused my attention on the other hole with the original smaller drill bit and I don’t know what it is with this old house but they must have dipped the wood in adamantium because it doesn’t like to be screwed. After getting the hole the right size, which by the way took about ten minutes with a very powerful drill, and having already dumped the pot yet another time, it was time to dump it again, after all, it filled up every five minutes.
With this issue somewhat taken care of, I quickly set my attention to getting the rest of the sink attached to the faucet and drain. I had put the faucet on already, and did all the prep of plumber’s taping the areas that needed to be and attached it to the existing drain, moved the pedestal roughly into place and put the sink on top and saw that there was a rather large gap between the drain and the hole in the sink where it should have been inserted to. No problem! We have a hole horde of extra plumbing pipes in the garage from other various fixes with the sinks in the kitchen and main bathroom. Checking over the stash, I grabbed two pipes that might work, put them into place, and then put them back into the bin they were stored in, grabbing another piece that was bendy since I had to not only make it a half an inch further out than it was, but also needed the thinner pipe, and when it was in place and the sink was sat upon it the fit was perfect. Finally, something’s gone right!
Working fast, I connected the leaking hoses to the sink which I apparently bought two that were too short and had to go into the garage and disconnect the ones on the old sink and use those, as well as puttied the drain opener and wrenched it in tightly and began bolting it into the wall, starting with the one that would go between the studs. It took longer than anticipated, but was in place and sturdy, so I started the other one. This took much longer than anticipated, especially given I pre-drilled holes, and when it was about halfway into the wall, the screw snapped in half, causing me to yell, with the window and doors open mind you, GDMFCSSOAB!!! I decided the first initials of each cuss word that slew from my vocal orifice will suffice for this part, as I’m certain our 90+ year old next door neighbor was taken aback by my outburst, as was our dog, Lucy, who ran up to the half bath to investigate. At this point, I threw everything down and said I was finished for the day. Okay, so I grabbed my camera, took a picture of the offending snapped off bolt and where the rest it was firmly attached to the wall, then said I was done. So, sink is in, but not very well, and the drain leaks a little. Grrr…

Figuring that I should avoid the hose issue that I had with the toilet, I went back to the hardware store and picked up two faucet hoses. With everything else ready to go, I went about disconnecting the sink from the wall. Basically it is being held up by a fairly thick piece of metal with a bent curve screwed into the wall into what I would assume to be wood. It also seems to be in place by shifting some of its weight onto the pipes it also rests upon, which with metal pipes I’m sure isn’t that big of an issue and certainly not something you’d want to try using plastic. Now, from turning off the water line and opening the faucets I knew that the cold water had a minor drip, about one every three seconds, which for our house is pretty good for a shut-off valve. But it wasn’t until I disconnected the hoses that I realized the extent of this drip, which I anticipated with a towel and pitcher, which, let’s just say, wasn’t enough. I decided to connect the new hoses quickly, hoping it would alleviate some of the water seepage, but the pitcher was quickly overwhelmed and I had to grab my 12 quart stock pot to perform its duty of keeping water from getting all over our beautiful slate floors.

With this issue somewhat taken care of, I quickly set my attention to getting the rest of the sink attached to the faucet and drain. I had put the faucet on already, and did all the prep of plumber’s taping the areas that needed to be and attached it to the existing drain, moved the pedestal roughly into place and put the sink on top and saw that there was a rather large gap between the drain and the hole in the sink where it should have been inserted to. No problem! We have a hole horde of extra plumbing pipes in the garage from other various fixes with the sinks in the kitchen and main bathroom. Checking over the stash, I grabbed two pipes that might work, put them into place, and then put them back into the bin they were stored in, grabbing another piece that was bendy since I had to not only make it a half an inch further out than it was, but also needed the thinner pipe, and when it was in place and the sink was sat upon it the fit was perfect. Finally, something’s gone right!
Working fast, I connected the leaking hoses to the sink which I apparently bought two that were too short and had to go into the garage and disconnect the ones on the old sink and use those, as well as puttied the drain opener and wrenched it in tightly and began bolting it into the wall, starting with the one that would go between the studs. It took longer than anticipated, but was in place and sturdy, so I started the other one. This took much longer than anticipated, especially given I pre-drilled holes, and when it was about halfway into the wall, the screw snapped in half, causing me to yell, with the window and doors open mind you, GDMFCSSOAB!!! I decided the first initials of each cuss word that slew from my vocal orifice will suffice for this part, as I’m certain our 90+ year old next door neighbor was taken aback by my outburst, as was our dog, Lucy, who ran up to the half bath to investigate. At this point, I threw everything down and said I was finished for the day. Okay, so I grabbed my camera, took a picture of the offending snapped off bolt and where the rest it was firmly attached to the wall, then said I was done. So, sink is in, but not very well, and the drain leaks a little. Grrr…

Friday, April 23, 2010
Half Bath Renovation: Toilet Installation
Installing a toilet should not be that complicated, especially when you thought of everything that you would need in order to install it correctly. However, it is the things you didn’t think of that have the possibility and much greater chance of going wrong.
Our house is old to begin with. Things don’t work as well as they used to. And apparently toilet bolts are not installed the same way anymore either. When my partner got all aggressive and removed the old toilet, he also took out the old bolts because they were old and gross and probably original to our 1956 Ranch Style home. I was not paying too much attention to this because, well, it is a tiny bathroom and if you put more than one person in you wouldn’t be able to open the door to get out. I’m being serious. It is really that diminutive. This didn’t really become an apparent problem until nine months later when we finally started putting in the slate tile and had to attach the bolts to the closet ring, for which we figured we’d need an extender and also had to get a new ring attachment because the old bolts were screwed into the ring and the new bolts you just can’t do that with unless you are under the house, which I was not about to do.
No problem, right? Just screw on a new ring into the subfloor over the old ring and everything will magically be fixed, right? HA!!! As I started to screw the new ring into the subfloor, and was four of six screws in, I realized the last two screws wouldn’t be going into anything because, well, there was no decking and you could see down to the bottom of the crawl space where two beady little red eyes were staring right back at me menacingly, as if telepathically communicating its intentions of performing bodily harm. Okay, so the last part might not have happened, but the crawl space beneath our house is scary as all get out.
So anyway, after the base and shoe molding was done, the ring had been installed for a few days, I decided to tackle putting in the toilet by myself as my partner has been quite busy with work and volunteering. I opened the box, put the wax ring in place after zapping it in the microwave for two five second bursts to bring it up to room temperature as it had been in the garage and was a little cold, lifted it up and set it into place. All went rather smooth and it was only slightly off level, so I opened the package of toilet leveling shims (see, I told you we thought of everything) put them into place and marked where each would need to be trimmed before cutting and putting them back. I then tightened the bolts to the toilet, which we got the easy snap kind that are supposed to snap off where the excess is, and the first one came off easily, but the other one was quite stubborn and I couldn’t get it to come off when the doorbell rang and I thought it was a solicitor so I ignored it, but then there came knocking and another ring and the dog wouldn’t stop barking, so I opened the door to the garage and saw my sister’s car in the driveway through the windows in the garage door.
After about an hour of chit-chatting about life with my sister, I went back to the evil little bolt, this time with a hacksaw, and began cutting through it the old-fashioned way, which after about half cut I grabbed my pliers again and it came off. I put the caps on, grabbed the tank, got it all attached, hooked up the water and everything was going smooth and I thought, wow, I did it! I flushed the toilet three times and checked everywhere for leaks and was well pleased that there were none then went to go eat dinner because now it was 8:30pm and I hadn’t eaten anything since 11am. When I was done eating, I went to check on the toilet again, but this time there was a problem… it was leaking. Apparently on our quest to think of everything, we didn’t think that a new hose would also be in order, and it was compromised between the hose and the nut connector. So I turned off the water supply, put a bowl under it and decided I could go get a new one the next day, which I did, and so now we finally have two working toilets in the house again!


Our house is old to begin with. Things don’t work as well as they used to. And apparently toilet bolts are not installed the same way anymore either. When my partner got all aggressive and removed the old toilet, he also took out the old bolts because they were old and gross and probably original to our 1956 Ranch Style home. I was not paying too much attention to this because, well, it is a tiny bathroom and if you put more than one person in you wouldn’t be able to open the door to get out. I’m being serious. It is really that diminutive. This didn’t really become an apparent problem until nine months later when we finally started putting in the slate tile and had to attach the bolts to the closet ring, for which we figured we’d need an extender and also had to get a new ring attachment because the old bolts were screwed into the ring and the new bolts you just can’t do that with unless you are under the house, which I was not about to do.
No problem, right? Just screw on a new ring into the subfloor over the old ring and everything will magically be fixed, right? HA!!! As I started to screw the new ring into the subfloor, and was four of six screws in, I realized the last two screws wouldn’t be going into anything because, well, there was no decking and you could see down to the bottom of the crawl space where two beady little red eyes were staring right back at me menacingly, as if telepathically communicating its intentions of performing bodily harm. Okay, so the last part might not have happened, but the crawl space beneath our house is scary as all get out.
So anyway, after the base and shoe molding was done, the ring had been installed for a few days, I decided to tackle putting in the toilet by myself as my partner has been quite busy with work and volunteering. I opened the box, put the wax ring in place after zapping it in the microwave for two five second bursts to bring it up to room temperature as it had been in the garage and was a little cold, lifted it up and set it into place. All went rather smooth and it was only slightly off level, so I opened the package of toilet leveling shims (see, I told you we thought of everything) put them into place and marked where each would need to be trimmed before cutting and putting them back. I then tightened the bolts to the toilet, which we got the easy snap kind that are supposed to snap off where the excess is, and the first one came off easily, but the other one was quite stubborn and I couldn’t get it to come off when the doorbell rang and I thought it was a solicitor so I ignored it, but then there came knocking and another ring and the dog wouldn’t stop barking, so I opened the door to the garage and saw my sister’s car in the driveway through the windows in the garage door.
After about an hour of chit-chatting about life with my sister, I went back to the evil little bolt, this time with a hacksaw, and began cutting through it the old-fashioned way, which after about half cut I grabbed my pliers again and it came off. I put the caps on, grabbed the tank, got it all attached, hooked up the water and everything was going smooth and I thought, wow, I did it! I flushed the toilet three times and checked everywhere for leaks and was well pleased that there were none then went to go eat dinner because now it was 8:30pm and I hadn’t eaten anything since 11am. When I was done eating, I went to check on the toilet again, but this time there was a problem… it was leaking. Apparently on our quest to think of everything, we didn’t think that a new hose would also be in order, and it was compromised between the hose and the nut connector. So I turned off the water supply, put a bowl under it and decided I could go get a new one the next day, which I did, and so now we finally have two working toilets in the house again!


Thursday, April 22, 2010
Half Bath Renovation: Base Molding… Part Shoe
If you have carpet, chances are you probably only have a base molding if any at all. However, for hard surfaces there is usually another piece attached… the shoe molding.
When we set about to locate the proper base and shoe molding, we did so with the intention of replicating the look found throughout our house’s hardwood floors. This, my friends, was no easy task. Then again, it probably wasn’t easy because we were searching for the easy stuff, you know, already primed and ready to paint. It never occurred to us that the molding we were looking for was actually stain grade molding even though we knew that our original molding had been stained at one time. However, once this crisis was averted and we located the correct materials we had a whole new set of crises to deal with, like how to cut and install everything. Thank goodness for the internet!
So yesterday I wrote about installing the base molding and today is about the shoe molding. It being smaller, one might assume it would be easier to install than the base, and fortunately one would be correct in their assumption… to a point. Shoe molding, being smaller, will split if you simply nail it in. What is a person to do when faced with this particular dilemma? Find the smallest drill bit you have and pre-drill holes for the nails to go into. I found the 1/16th inch drill bit perfect as it was slightly smaller than the finishing nails and did not split the wood at all. I probably should have pre-drilled a few areas on the base molding to prevent some of those cracks, but didn’t think it was necessary until it was too late. Figures. I guess that is what painter’s putty is for, right? More on that later.

After the first piece was cut to size and pre-drilled it was ready to be nailed into place. I used a very small amount of Liquid Nails from a caulking gun to help stabilize the piece while it was being nailed in. After I had nailed the first piece of shoe molding into place I realized I only drilled holes at the studs, just like with the base molding, but neglected to drill any at either end to keep those areas in place. So with it mostly nailed in I grabbed the drill and made holes on either side to keep those sections where we wanted them. Hey, this is all a learning experience. The rest of the pieces went by in the same fashion, with the exception that I did remember to drill holes on each end as well as the stud marks, except for that last section. Do you remember yesterday I wrote about that tiny little piece of base molding that had to go into that tiny little space between the door and wall on one side? Well, the shoe molding is even smaller. Fortunately it was also way easier to put in, but is only glued on with Liquid Nails, just like the base molding it is attached to. Hopefully that will be enough to keep it in place.


Once all the shoe molding was installed and nailed in, I took a nail setter to countersink the nails into the molding before applying painter’s putty to them. After it was dry, and I used this fabulous stuff that goes on pink and turns white when it is dry so I don’t have to guess when it is ready, I sanded the putty down and using a small paint brush painted over the putty to hide the nail marks. I also painted a thin layer where the base and shoe molding meet because there were some very thin spaces in a few areas, and it would make it look like it was all one piece. Then I used a white caulk where the base meets the wall and where the corner pieces meet, smoothing it out with my fingers, and also used colored caulking, the same as our grout, to caulk where the shoe meets the slate floor.

Now the room is so close to being finished and the next step is the toilet and possibly a new sink. We’ll see how aggressive I get today.
When we set about to locate the proper base and shoe molding, we did so with the intention of replicating the look found throughout our house’s hardwood floors. This, my friends, was no easy task. Then again, it probably wasn’t easy because we were searching for the easy stuff, you know, already primed and ready to paint. It never occurred to us that the molding we were looking for was actually stain grade molding even though we knew that our original molding had been stained at one time. However, once this crisis was averted and we located the correct materials we had a whole new set of crises to deal with, like how to cut and install everything. Thank goodness for the internet!
So yesterday I wrote about installing the base molding and today is about the shoe molding. It being smaller, one might assume it would be easier to install than the base, and fortunately one would be correct in their assumption… to a point. Shoe molding, being smaller, will split if you simply nail it in. What is a person to do when faced with this particular dilemma? Find the smallest drill bit you have and pre-drill holes for the nails to go into. I found the 1/16th inch drill bit perfect as it was slightly smaller than the finishing nails and did not split the wood at all. I probably should have pre-drilled a few areas on the base molding to prevent some of those cracks, but didn’t think it was necessary until it was too late. Figures. I guess that is what painter’s putty is for, right? More on that later.


Once all the shoe molding was installed and nailed in, I took a nail setter to countersink the nails into the molding before applying painter’s putty to them. After it was dry, and I used this fabulous stuff that goes on pink and turns white when it is dry so I don’t have to guess when it is ready, I sanded the putty down and using a small paint brush painted over the putty to hide the nail marks. I also painted a thin layer where the base and shoe molding meet because there were some very thin spaces in a few areas, and it would make it look like it was all one piece. Then I used a white caulk where the base meets the wall and where the corner pieces meet, smoothing it out with my fingers, and also used colored caulking, the same as our grout, to caulk where the shoe meets the slate floor.

Wednesday, April 21, 2010
Half Bath Renovation: Base Molding… Part 1
Do you ever start a project and wish that you’d just gone with the original plan? Hand cutting hardwood base molding definitely falls into that category.
After we had finally located base and shoe molding that matches the molding surrounding the hardwood floors in our house, I primed and painted it white to match the trim around the window and door in the half bathroom, and gave those another couple fresh coats too. Normally I am not a fan of painted wood, especially when it is a beautiful stain grade, but I was not about to strip the paint off the window and door trim, so paint I did.
So yesterday after the paint was dry I thought, should I wait till my partner gets home so we can go to his dad’s house and borrow his compound miter saw, or should I just hand cut the pieces? Logic was apparently not on my side, because I chose the latter. I guess I figured that it being such a small space with minimal cutting that it wouldn’t be such a chore, but I figured wrong. Oh, so very wrong was I. Very, very, very wrong. I mean really, very, absolutely, incredibly, exceptionally, awfully, exceedingly, most definitely wrong.
I really wanted to surprise my partner with the molding finished when he got home, but what I didn’t take into account was that hemlock is a fairly hard wood, and our cheap plastic miter box isn’t exactly the most stable of tools since, well, we don’t have a table to make the cuts so instead I was on the floor of the kitchen and the damned saw kept getting caught in the grooves at the top for the saw insert and kept making high pitched squealing noises that sounded quite like my voice after eating pineapple that one time when I was thirteen. Long story short, it was a pain in the ass and I have blisters to prove it.

But, to make this sound not completely like I didn’t have any success, I did a ton of research and found a website with a diagram quite like our bathroom and instructions for installing base and shoe molding using the “Butt and Cope” method. I know, it sounds dirty and makes me giggle like a little school girl when I say and read it too, but this looks like how our current molding was installed back in 1956 and I’ve never seen a gap at the corners so I figured that it must work. Basically you make an inside miter cut like you would for a typical forty-five degree install, but using the cut line as a guide, take a coping saw and trim off the mitered edge, leaving you with a perfect contour to butt up against the straight cut molding. And this takes time to do, but will eliminate the need to figure out the exact angle since we all know our house isn’t perfectly square, and will allow the wood to shrink and contract without any gaps showing.

While I wanted to get the base and the shoe molding up, time wasn’t on my side and I was only able to install the base molding. I know, this room is tiny and I should’ve been able to accomplish this all in an afternoon easily, and with a compound miter saw a matter of minutes, but I really took my time to measure, mark, and measure again and mark again if needed so that all my cuts would be perfect. That is, until I came upon the tiny little piece that fits between the door and adjoining wall where there is only an inch to work in, half of which is taken up by the butt joint of the base molding. This piece still hasn’t been installed because, well, I need to keep filing and sanding it down to fit because my original measurement was an eighth of an inch too big. Yes, this piece has quite possibly become the bane of my existence.

After we had finally located base and shoe molding that matches the molding surrounding the hardwood floors in our house, I primed and painted it white to match the trim around the window and door in the half bathroom, and gave those another couple fresh coats too. Normally I am not a fan of painted wood, especially when it is a beautiful stain grade, but I was not about to strip the paint off the window and door trim, so paint I did.
So yesterday after the paint was dry I thought, should I wait till my partner gets home so we can go to his dad’s house and borrow his compound miter saw, or should I just hand cut the pieces? Logic was apparently not on my side, because I chose the latter. I guess I figured that it being such a small space with minimal cutting that it wouldn’t be such a chore, but I figured wrong. Oh, so very wrong was I. Very, very, very wrong. I mean really, very, absolutely, incredibly, exceptionally, awfully, exceedingly, most definitely wrong.
I really wanted to surprise my partner with the molding finished when he got home, but what I didn’t take into account was that hemlock is a fairly hard wood, and our cheap plastic miter box isn’t exactly the most stable of tools since, well, we don’t have a table to make the cuts so instead I was on the floor of the kitchen and the damned saw kept getting caught in the grooves at the top for the saw insert and kept making high pitched squealing noises that sounded quite like my voice after eating pineapple that one time when I was thirteen. Long story short, it was a pain in the ass and I have blisters to prove it.


Wednesday, April 14, 2010
Half Bath Renovation: Adventures in Toilet Buying
Since when did toilets get so complicated? Between the various GPFs (gallons per flush) and ranges of “white” and classes and styles, there’s also the hefty price tag these fairly utilitarian unitaskers are asking for.
We had replaced our toilet in the main bath a couple years ago with a Kohler Cimarron and figured it’d be pretty easy to get another for the half bath so they’d match. However, apparently toilets are like cars and they come out with new models every year, as well as have numerous versions of each model to contend with each other. Having so many choices from which to relieve oneself, I thought that I’d gone the safe route of picking the same model as we picked for the main bath because, at least on the outside they looked identical.

It wasn’t until I brought it home that I realized they had made a few minor improvements. First of all, the inside rim curves down at a forty-five degree angle rather than the straight ninety the earlier model has, which, honestly, is a pain to keep clean for some reason. Hopefully this adjustment will help. Also, this one came with a toilet seat and wax ring with bolts, and our other toilet did not. We’ll see how we care for the standard seat after having the quiet-close version in the main bath.
With as much as we were hoping to get the exact same toilet we have in our main bath, the most important part was that it be elongated and chair height. Those two things alone make a huge difference in the comfort of relieving oneself. I just hope that it isn’t too big to fit into the half bath because I hate returning things… really, really hate returning things. But it’ll be a few days before we can install it, as my plan is to do the final cleaning of the tiles today and the final sealing tomorrow, which means Friday at the earliest.
Of course, the biggest shocker to these new toilets is their price tag. I mean, we felt like we were getting a bargain at only spending $248 on a new toilet when compared to some of the others out on the market! Seriously? It flushes poop people! C’mon, do you really need a $700 (and up) waste extractor?
We had replaced our toilet in the main bath a couple years ago with a Kohler Cimarron and figured it’d be pretty easy to get another for the half bath so they’d match. However, apparently toilets are like cars and they come out with new models every year, as well as have numerous versions of each model to contend with each other. Having so many choices from which to relieve oneself, I thought that I’d gone the safe route of picking the same model as we picked for the main bath because, at least on the outside they looked identical.

With as much as we were hoping to get the exact same toilet we have in our main bath, the most important part was that it be elongated and chair height. Those two things alone make a huge difference in the comfort of relieving oneself. I just hope that it isn’t too big to fit into the half bath because I hate returning things… really, really hate returning things. But it’ll be a few days before we can install it, as my plan is to do the final cleaning of the tiles today and the final sealing tomorrow, which means Friday at the earliest.
Of course, the biggest shocker to these new toilets is their price tag. I mean, we felt like we were getting a bargain at only spending $248 on a new toilet when compared to some of the others out on the market! Seriously? It flushes poop people! C’mon, do you really need a $700 (and up) waste extractor?
Monday, April 12, 2010
Half Bath Renovation: Grout
Grouting ceramic tile is in and of itself a pain in the ass. Grouting slate tile ups that by a factor of a gazillion.
Okay, so, I’ve grouted before, so I know that it can be cumbersome with all the wiping and wiping of the excess grout that forms a haze over the tile that indelibly occurs while grouting the traditional way. To try to bring that particular issue to a minimum, my partner reads on the internets that you can simply fill a heavy duty Ziploc bag with grout, cut a small hole in a corner and squeeze out the grout into the lines, thus, bypassing the messiness. I must have done something wrong in the mixing process (or got distracted by the neighbors stopping by) because when I put the grout into the bag I thought to myself this is just like frosting consistency and should be a piece of cake to pipe! How misleading this was.
I snipped a hole a little larger than the grout line and started to squeeze and noticed I couldn’t even get the stuff to come out at all. So, I figured I needed a bigger hole. That didn’t work, it just looked like it was building up pressure and waiting to pop like a balloon, a grout balloon, full of sticky grey Crystalline-Entity-filled poop consistency goo. At this point, I’m pretty certain a whole slew of cusswords flew out of my mouth and the realization that I’d have to go about it the old fashioned way was quickly setting in and reinforced when my partner said it aloud. Good thing we sealed the tile first! Of course, I could have always made another batch of grout and added a little more water, but that would have been easy and seriously, when do I ever make anything easy on myself?
Using the Ziploc bag to keep the grout as gooey as it could be, I cut the hole a little larger and squeezed out a little at a time and used a grout float to fill in the lines. This process certainly sounds easier than it is, because you see, slate isn’t all smooth and perfectly level like, say, ceramic tile, and so grouting takes a lot more time. And when you’re done, it looks like you just seriously screwed up all the hard work you’ve put into the project up to this point because the slate tiles now look like crap.


When the two hour waiting period was over, I grabbed the now almost dry sponge and began wiping the haze off and the tiles looked absolutely fantastic… for about ten minutes before another layer of haze formed. This time I decided to dry the dry buff method, which seemed to get about half the tiles clean, but the other half still had quite a bit of grout in all those fine lines, so I went back over it with a now wrung out sponge and focused on those areas. This still doesn’t get everything, but almost everything, and isn’t that close enough? Well, this morning I’m running a mental debate over whether I should try at it one more time or simply allow the small amount of excess grout to stay in the nooks and crannies because it is a natural grey color that blends in nicely with the tiles and it will act as a stabilizer for those parts and prevent them from chipping, right? Oh well, I’m sure it’ll all work out in the end.

Okay, so, I’ve grouted before, so I know that it can be cumbersome with all the wiping and wiping of the excess grout that forms a haze over the tile that indelibly occurs while grouting the traditional way. To try to bring that particular issue to a minimum, my partner reads on the internets that you can simply fill a heavy duty Ziploc bag with grout, cut a small hole in a corner and squeeze out the grout into the lines, thus, bypassing the messiness. I must have done something wrong in the mixing process (or got distracted by the neighbors stopping by) because when I put the grout into the bag I thought to myself this is just like frosting consistency and should be a piece of cake to pipe! How misleading this was.
I snipped a hole a little larger than the grout line and started to squeeze and noticed I couldn’t even get the stuff to come out at all. So, I figured I needed a bigger hole. That didn’t work, it just looked like it was building up pressure and waiting to pop like a balloon, a grout balloon, full of sticky grey Crystalline-Entity-filled poop consistency goo. At this point, I’m pretty certain a whole slew of cusswords flew out of my mouth and the realization that I’d have to go about it the old fashioned way was quickly setting in and reinforced when my partner said it aloud. Good thing we sealed the tile first! Of course, I could have always made another batch of grout and added a little more water, but that would have been easy and seriously, when do I ever make anything easy on myself?
Using the Ziploc bag to keep the grout as gooey as it could be, I cut the hole a little larger and squeezed out a little at a time and used a grout float to fill in the lines. This process certainly sounds easier than it is, because you see, slate isn’t all smooth and perfectly level like, say, ceramic tile, and so grouting takes a lot more time. And when you’re done, it looks like you just seriously screwed up all the hard work you’ve put into the project up to this point because the slate tiles now look like crap.

After I was done grouting, I began the process of wiping off the excess from the tile and in the process smooth out the grout lines. This takes forever because of the aforementioned nooks and crannies slate tiles have that invariably are happy little hiding places for grout to reside. I ended up rinsing out the sponge about fifty times before allowing it to set for a couple hours to do the next step, wiping off the haze. Naturally, the haze began to form more noticeably on the darker tiles, but it all wiped off pretty easily, albeit slowly, during the initial pass-through so I figured the haze wipe would go nice and smooth. Who am I kidding?


Friday, April 9, 2010
Half Bath Renovation: Setting the Tiles
With all the tiles dry fitted and cuts done, it was time to mix up a batch of thinset and place them in. Oh, if only it was that easy.
When all the pieces were definitely where we wanted them, I decided to label them with blue masking tape using the numbers 1-25, as there were that many pieces used. To make sure they were all placed where they needed to go back after piling them up and moving them away so the thinset bed could be laid, I drew up a simple guide with grid paper. I didn’t have to refer to the grid, but that is probably because I drew one up. I’m certain the results would have been disastrous had I skipped this step!


So while I piled up the tiles, my partner mixed up the thinset, wearing the proper personal protective equipment like goggles and face mask of course, and then I vacuumed up the floor well to get rid of any dust, hair, dirt, flakey thingies that might be on the backer board and cause adhesion issues. Once everything was prepped, it was time to start spreading thinset onto the backer board. This process shouldn’t be that complicated, but somehow I managed. You see, the space is small, and I mean very small, and there are obstacles and hazards at every turn… literally. I only got ten tiles put in while I was physically in the bathroom before I had to move out of it to continue because there wasn’t room enough for me and the sink, which I don’t even know why we still had in there because the plan is to replace it, but then again, it came in handy after I put in the first tile and needed to wash the excess off quickly so I could wipe down the tile that had thinset fingerprints all over the top of it. And of course, this would also be the perfect time for the toilet’s shut off valve to decide to start leaking! Brilliant! Actually I believe my exact words were, “That’s just great!” as my partner can attest to because I said it at least a hundred times.
Okay, so, to get the best adhesion possible and to even out the tiles, I spread the thinset and notched it using the notchy side of the mortar trowel, and then spread thinset onto the back of the tile itself, trying to fill up thin areas before laying them down. Let’s just say, this works well in your head, but had varying results in the real world. I had to keep telling myself, this is only the half bath and not a large area and is practice for the laundry room and kitchen and main bath so don’t worry if it isn’t perfect. Which, well, let’s be honest… it is far from perfect. I mean, it’s difficult to make perfect grout line areas when the tiles are not perfectly square! Oh well, that is the charm of slate, and the results will not be that noticeable as we are using 1/8” spacers for that thin of a grout line. Our original plan was to simply butt them up to one another, but everything I read about that in a bathroom or kitchen was that it caused mold and mildew to form between the tiles, and with all the issues we’ve had with those fungi in our house, we decided it would be best to not encourage them to find new hiding places.

With all the tiles in place, and my hands now covered in thinset, we now have to wait for a couple days to ensure enough drying time. I believe the plan is to go to Coco’s Fine Tile and Marble and get some sealant and grout so we can finish the project. Well, the tiling part of it anyway! This has all been a learning experience so far, and things I’ve learned from thinset so far, is next time I tile I’m wearing gloves because my fingertips, after a thorough scrubbing with lots of hot soapy water, feel like they have a million tiny shards of glass embedded in them, which, of course, they probably do! Oh, and one more thing; while I did have knee pads on, they should come with a warning that in order for them to stay on your knees while doing a project, they have to be tight enough to cut off circulation to your legs, feet and toes. What the hell is that all about?
When all the pieces were definitely where we wanted them, I decided to label them with blue masking tape using the numbers 1-25, as there were that many pieces used. To make sure they were all placed where they needed to go back after piling them up and moving them away so the thinset bed could be laid, I drew up a simple guide with grid paper. I didn’t have to refer to the grid, but that is probably because I drew one up. I’m certain the results would have been disastrous had I skipped this step!


Okay, so, to get the best adhesion possible and to even out the tiles, I spread the thinset and notched it using the notchy side of the mortar trowel, and then spread thinset onto the back of the tile itself, trying to fill up thin areas before laying them down. Let’s just say, this works well in your head, but had varying results in the real world. I had to keep telling myself, this is only the half bath and not a large area and is practice for the laundry room and kitchen and main bath so don’t worry if it isn’t perfect. Which, well, let’s be honest… it is far from perfect. I mean, it’s difficult to make perfect grout line areas when the tiles are not perfectly square! Oh well, that is the charm of slate, and the results will not be that noticeable as we are using 1/8” spacers for that thin of a grout line. Our original plan was to simply butt them up to one another, but everything I read about that in a bathroom or kitchen was that it caused mold and mildew to form between the tiles, and with all the issues we’ve had with those fungi in our house, we decided it would be best to not encourage them to find new hiding places.

With all the tiles in place, and my hands now covered in thinset, we now have to wait for a couple days to ensure enough drying time. I believe the plan is to go to Coco’s Fine Tile and Marble and get some sealant and grout so we can finish the project. Well, the tiling part of it anyway! This has all been a learning experience so far, and things I’ve learned from thinset so far, is next time I tile I’m wearing gloves because my fingertips, after a thorough scrubbing with lots of hot soapy water, feel like they have a million tiny shards of glass embedded in them, which, of course, they probably do! Oh, and one more thing; while I did have knee pads on, they should come with a warning that in order for them to stay on your knees while doing a project, they have to be tight enough to cut off circulation to your legs, feet and toes. What the hell is that all about?
Wednesday, April 7, 2010
Half Bath Renovation: Making the Cut(s)
After the ordeal with the tile saw, I felt it best to research what we wanted, at a price we could afford. Of course, I also felt it best to go buy it alone with the return money from the first saw and blade so as to just get one and start using it without an argument ensuing!
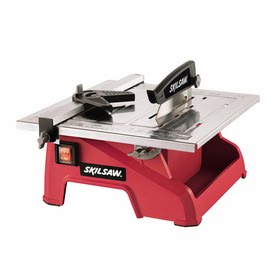
The first thing I wanted to do, and I’m not a stickler for things like this, I swear, was look for a name brand I recognized. Why? For the simple fact they are easier to research. Sure I typed into Google “7” wet tile saw 5/8” arbor slate” and was inundated with a multitude of choices and only two names I recognized. But to simplify this search, I decided to find out more about a specific tile saw I noticed at Lowe’s… a Skil Wet Tile Saw.
This compact saw had what seemed to be everything we were looking for: a stainless steel table; water reservoir for wet cutting; portable; priced under $100; and most importantly, a 5/8” arbor hole so we can actually find blades to fit the damned thing! The only thing it didn’t have was reviews because it is so new to the market. So, do I take the gamble and buy it, or do I go with something that has been on the market longer? I took the gamble, and so far, am very glad I did.

He had cut the two tiles around the toilet ring, and didn’t have success with the cuts around the vent, probably because I marked them from the underside. Of course, I chose those pieces because they had flaws that I wanted cut out anyway and they just happened to be in the area where the vent hole was. Needless to say, the pieces were probably too fragile to begin with because of the flaws, and they both cracked. I wasn’t worried, as we had plenty of tiles, and still needed to make cuts for the one end where we’d need 1¼” strips. Instead I used a scrap piece of cardboard from one of the boxes the tiles came in and made a template the same size as the vent hole and traced my cut lines onto the tiles using that. I cut the two sides first then made half-inch cuts in between and simply broke off the small thin lines of tile I had made, using pliers to cut the small sections at the end to square it off. I cut out the final piece around the door frame and the thin cuts too, and put them into place. Success! Our dry fit is complete! Now onto the next step, numbering and labeling them before setting them with thinset.

The first thing I wanted to do, and I’m not a stickler for things like this, I swear, was look for a name brand I recognized. Why? For the simple fact they are easier to research. Sure I typed into Google “7” wet tile saw 5/8” arbor slate” and was inundated with a multitude of choices and only two names I recognized. But to simplify this search, I decided to find out more about a specific tile saw I noticed at Lowe’s… a Skil Wet Tile Saw.
This compact saw had what seemed to be everything we were looking for: a stainless steel table; water reservoir for wet cutting; portable; priced under $100; and most importantly, a 5/8” arbor hole so we can actually find blades to fit the damned thing! The only thing it didn’t have was reviews because it is so new to the market. So, do I take the gamble and buy it, or do I go with something that has been on the market longer? I took the gamble, and so far, am very glad I did.
We started laying out the tiles where we wanted them to go in the half bath, moving and shuffling them around until they looked nice and randomy. Once we had the tiles where we wanted them, it was just a matter of cutting the tiles that needed to be cut. So, with pencil in hand, I marked out the cut lines and my partner made the cuts for about half of the tiles we needed before he had to go to a meeting at church. This meant that if I wanted the dry fit to be done, I’d have to cut the other half myself. Gulp!
He had cut the two tiles around the toilet ring, and didn’t have success with the cuts around the vent, probably because I marked them from the underside. Of course, I chose those pieces because they had flaws that I wanted cut out anyway and they just happened to be in the area where the vent hole was. Needless to say, the pieces were probably too fragile to begin with because of the flaws, and they both cracked. I wasn’t worried, as we had plenty of tiles, and still needed to make cuts for the one end where we’d need 1¼” strips. Instead I used a scrap piece of cardboard from one of the boxes the tiles came in and made a template the same size as the vent hole and traced my cut lines onto the tiles using that. I cut the two sides first then made half-inch cuts in between and simply broke off the small thin lines of tile I had made, using pliers to cut the small sections at the end to square it off. I cut out the final piece around the door frame and the thin cuts too, and put them into place. Success! Our dry fit is complete! Now onto the next step, numbering and labeling them before setting them with thinset.

Tuesday, April 6, 2010
Half Bath Renovation: Tile Saws
After talking with my dad Saturday, we went to the store he recommended and bought a small tile saw and blade for cutting slate. Thus, we were suddenly thrust into the world of the impossible to find 1” arbor.
When we walked into the hardware store, we both seemed to be immediately drawn to the most expensive tile saw they had on display. I don’t know what it is, but it was beautiful and looked so sturdy and you could also buy a stand for it! Then we looked at the smaller table saws, and were slightly unimpressed after seeing the other, with its handle to push the blade into the tile and large water basin and sleek styling of steel with accents of orange. Of the smaller portable tile table saws we looked at, there were two sizes of blades. The four inch saw was lightweight and looked to be easy to move and store but was also mostly plastic, and the 7 inch saw had a chrome table with a metal base and looked to be the more sturdy of the two, and was only about ten dollars more.
So we’ve chosen the tile saw, now we need to get a blade to cut slate. That should be easy, right? Ha! Searching through the blade selection it seemed that every blade we found with a continuous rim, rather than notched, would not work for slate tile cutting. Finally we located a 7” blade for slate, but it was notched and for dry cutting only, and we really wanted to utilize the wet cutting method to reduce dust and friction. But, we figured we’d get it anyway and worst comes to worst, dry cut the tiles instead of wet. So we made our purchase, loaded it up into the car and took it home to be opened another day.
Of course, the next day was Easter, and a busy day at that, so nothing got done tile-wise then. Monday rolls around and we immediately get ready to go to another hardware store to see if they have the wet blade we were looking for and find one, take it home, and my partner proceeds to unpack and do the minor assembly to the saw that is required before we can get cutting. It was obvious there was a problem when he opened up the package to the wet tile saw blade and it wouldn’t fit. That’d be the time to open up the manual where it says that it takes blades with a 1” arbor, the hole in the middle of the blade that attaches to the machine itself. Nowhere on the box was this mentioned, and no blade we looked at had a 1” arbor hole. The 7” blades all seemed to have a 5/8” arbor, and so it was assumed on our part the saw we bought would be for blades with that size hole in the middle. Well, you know the old saying: Never assume anything, it makes an ASS out of U and ME.
And so we pack up the blades, and just in case the tile saw, and head back to the original hardware store to return the blade we got for one with the correct sized arbor. It became painfully obvious this was going to be, er, painfully headachey. The only blade with a 1” arbor would only work for ceramic tile and specifically said not for slate. So my partner returns the blade and we head to the other hardware store with the blade we bought there, the one that will work for wet slate tile cutting, and search for a same-purpose blade with the larger arbor and find nothing. Every tile saw we found with a 7” blade had the same arbor… 5/8”. Grrr! We make the decision to keep the blade we got there and go back to the original hardware store to return the tile saw and now we are back to square one.
I never thought this process would be so nerve-racking, simply finding a tile saw to cut slate. Apparently we need to do just a tad bit more research before resuming our quest. I’m at the point where the smaller, ugly plastic 4” tile saw we found would be fine with me… if only we could locate a slate tile cutting blade for it!
When we walked into the hardware store, we both seemed to be immediately drawn to the most expensive tile saw they had on display. I don’t know what it is, but it was beautiful and looked so sturdy and you could also buy a stand for it! Then we looked at the smaller table saws, and were slightly unimpressed after seeing the other, with its handle to push the blade into the tile and large water basin and sleek styling of steel with accents of orange. Of the smaller portable tile table saws we looked at, there were two sizes of blades. The four inch saw was lightweight and looked to be easy to move and store but was also mostly plastic, and the 7 inch saw had a chrome table with a metal base and looked to be the more sturdy of the two, and was only about ten dollars more.
So we’ve chosen the tile saw, now we need to get a blade to cut slate. That should be easy, right? Ha! Searching through the blade selection it seemed that every blade we found with a continuous rim, rather than notched, would not work for slate tile cutting. Finally we located a 7” blade for slate, but it was notched and for dry cutting only, and we really wanted to utilize the wet cutting method to reduce dust and friction. But, we figured we’d get it anyway and worst comes to worst, dry cut the tiles instead of wet. So we made our purchase, loaded it up into the car and took it home to be opened another day.
Of course, the next day was Easter, and a busy day at that, so nothing got done tile-wise then. Monday rolls around and we immediately get ready to go to another hardware store to see if they have the wet blade we were looking for and find one, take it home, and my partner proceeds to unpack and do the minor assembly to the saw that is required before we can get cutting. It was obvious there was a problem when he opened up the package to the wet tile saw blade and it wouldn’t fit. That’d be the time to open up the manual where it says that it takes blades with a 1” arbor, the hole in the middle of the blade that attaches to the machine itself. Nowhere on the box was this mentioned, and no blade we looked at had a 1” arbor hole. The 7” blades all seemed to have a 5/8” arbor, and so it was assumed on our part the saw we bought would be for blades with that size hole in the middle. Well, you know the old saying: Never assume anything, it makes an ASS out of U and ME.
And so we pack up the blades, and just in case the tile saw, and head back to the original hardware store to return the blade we got for one with the correct sized arbor. It became painfully obvious this was going to be, er, painfully headachey. The only blade with a 1” arbor would only work for ceramic tile and specifically said not for slate. So my partner returns the blade and we head to the other hardware store with the blade we bought there, the one that will work for wet slate tile cutting, and search for a same-purpose blade with the larger arbor and find nothing. Every tile saw we found with a 7” blade had the same arbor… 5/8”. Grrr! We make the decision to keep the blade we got there and go back to the original hardware store to return the tile saw and now we are back to square one.
I never thought this process would be so nerve-racking, simply finding a tile saw to cut slate. Apparently we need to do just a tad bit more research before resuming our quest. I’m at the point where the smaller, ugly plastic 4” tile saw we found would be fine with me… if only we could locate a slate tile cutting blade for it!
Friday, April 2, 2010
Half Bath Renovation: Underlayment
Concrete backer board cut to fit? Check. Thinset mortar mixed and ready to be troweled? Check. Experienced installers? Be gentle, this is our first time.
My partner decided he wanted to get the underlayment on the floor, and I agreed. It was ready to go and wouldn’t take that long to install, so he mixed the thinset and allowed it to rest for about ten minutes before he began troweling it directly onto the decking subfloor. This worried me at first, me not standing over his shoulder questioning every little thing he was doing because I am incredulously annoying like that, but I figured I’ve never done this either, so I should maybe keep my big mouth shut just this once.
After he put the first piece in, I quickly went in to help screw the backer board into the decking to secure it even further. I started with just a couple screws in each back corner then screwed into every board, staggering them into a wave pattern to prevent any cracking that might occur, on the front of it so that when the second piece was installed we’d know where the decking was to screw into.

So I stepped out of the half bath and allowed my partner to trowel on the thinset to the other half so we could install the second piece. We dry fitted this, so it was bound to all fit together perfectly, right? Ha hahahahaha! Surely you jest! It became increasingly obvious that we needed to cut off about a quarter inch from one side in order to make it fit into place, so with thiset already gooping up the backer board, my partner takes it into the garage and proceeds to trim the piece. Of course, now that it is cut and laid to the point where we can’t pry it out without breaking it, where the two pieces meet are overlapped and not moving.
“Rubber mallet!” I proclaim. “I need a rubber mallet!”
“Where is it?” my partner asks as he walked into the garage.
“In the canning pantry, left side, third shelf down next to the toolbox,” I inform him with my eyes closed to imagine its exact location.
Within seconds he returns with the rubber mallet and a few quick whacks is all it takes to set the backer board into place. I begin screwing it into the decking, using the screws from the first piece as a guide to where the subfloor boards are, and work my way around before screwing the center areas. I also put in a few extra screws in the area where the floor was saggy and around the toilet.
When I was done screwing… that sounds dirty… I grabbed the joint tape, stuck it onto the seam, and troweled on some thinset over it. Underlayment laid and screwed and ready for tiling, only one more test before doing so… walk on the sag. So I step onto the area where it sagged and lo and behold it didn’t move. Now my partner tests out the area and it still doesn’t move. Success! Operation Underlayment complete! Now we have to dry fit the tile and mark any pieces that will require cutting. Ugh.

My partner decided he wanted to get the underlayment on the floor, and I agreed. It was ready to go and wouldn’t take that long to install, so he mixed the thinset and allowed it to rest for about ten minutes before he began troweling it directly onto the decking subfloor. This worried me at first, me not standing over his shoulder questioning every little thing he was doing because I am incredulously annoying like that, but I figured I’ve never done this either, so I should maybe keep my big mouth shut just this once.
After he put the first piece in, I quickly went in to help screw the backer board into the decking to secure it even further. I started with just a couple screws in each back corner then screwed into every board, staggering them into a wave pattern to prevent any cracking that might occur, on the front of it so that when the second piece was installed we’d know where the decking was to screw into.

“Rubber mallet!” I proclaim. “I need a rubber mallet!”
“Where is it?” my partner asks as he walked into the garage.
“In the canning pantry, left side, third shelf down next to the toolbox,” I inform him with my eyes closed to imagine its exact location.
Within seconds he returns with the rubber mallet and a few quick whacks is all it takes to set the backer board into place. I begin screwing it into the decking, using the screws from the first piece as a guide to where the subfloor boards are, and work my way around before screwing the center areas. I also put in a few extra screws in the area where the floor was saggy and around the toilet.
When I was done screwing… that sounds dirty… I grabbed the joint tape, stuck it onto the seam, and troweled on some thinset over it. Underlayment laid and screwed and ready for tiling, only one more test before doing so… walk on the sag. So I step onto the area where it sagged and lo and behold it didn’t move. Now my partner tests out the area and it still doesn’t move. Success! Operation Underlayment complete! Now we have to dry fit the tile and mark any pieces that will require cutting. Ugh.

Wednesday, March 31, 2010
Half Bath Renovation: Paint
There are times when painting can be fun. Then there is painting the extremely small, barely able to fit one person, half bathroom.
I take issue with paint that declares to be “One Coat” as it never only takes one coat to cover. Ever. Maybe if you were covering white on white it’d do alright, but that is a rather rare exception. But that is just a pet peeve of mine I suppose, as I’m certain to be the only person who has ever been flusterbated over it. But what angers me more is using quality paint and a supposedly professional quality paintbrush to cut it, and it yields crappier results than substandard paint and a cheap disposable paintbrush. Then again, sometimes you just have to have faith that both are actually doing their intended jobs, even if it doesn’t look like it at first.

While cutting in with a new angled brush, as my favorite angled brush somehow got lost in our church’s youth room spruce up, I could not for the life of me get the brush strokes to go away, no matter how heavy or light handed I was while painting. So I left a section alone, and continued to cut in the rest in crosshatches to get the most coverage possible, when I noticed the brush strokes had disappeared as the paint slowly spread to fill in the tiny gaps. Figures, as by the time I’d found that out I was nearly done cutting in a majority of the bathroom. I’d already planned on doing two coats, but really wanted to make sure the first one was on really well for the best possible coverage. Oh well, live and learn I guess.

After all the cutting in was completed it was time to move on to the rolling. Easy, right? Hehehe… okay, so the rolling was rather easy, except for the fact that the roller soaked up so much paint that a few areas had to be stippled with a flat brush, but I was ready to fix this and had the brush within reach. I also needed the brush to get into the small areas the roller couldn’t, and painted in those areas after stippling. What is stippling, you ask? Simply put, it is taking the tip of, say, a 4” flat brush that is at least half an inch thick and gently dotting the surface to blend the paint drips away. This usually creates the same effect as rolling. Just be careful that you are only lightly dotting the surface and not pushing all the way through, but then again, if you do, it can just be painted over. No biggie.

So last night I got the first coat done, as it took a lot longer for the primer to dry over all of the Loony Tunes characters than originally anticipated, probably because of the gross wetness that has been our spring so far. This made me incredibly sad to have to say goodbye, mostly to Marvin the Martian. We were hoping to have the paint and at least the backer board in place by yesterday, but alas, perhaps today will be the day. And maybe tile too.

I take issue with paint that declares to be “One Coat” as it never only takes one coat to cover. Ever. Maybe if you were covering white on white it’d do alright, but that is a rather rare exception. But that is just a pet peeve of mine I suppose, as I’m certain to be the only person who has ever been flusterbated over it. But what angers me more is using quality paint and a supposedly professional quality paintbrush to cut it, and it yields crappier results than substandard paint and a cheap disposable paintbrush. Then again, sometimes you just have to have faith that both are actually doing their intended jobs, even if it doesn’t look like it at first.

While cutting in with a new angled brush, as my favorite angled brush somehow got lost in our church’s youth room spruce up, I could not for the life of me get the brush strokes to go away, no matter how heavy or light handed I was while painting. So I left a section alone, and continued to cut in the rest in crosshatches to get the most coverage possible, when I noticed the brush strokes had disappeared as the paint slowly spread to fill in the tiny gaps. Figures, as by the time I’d found that out I was nearly done cutting in a majority of the bathroom. I’d already planned on doing two coats, but really wanted to make sure the first one was on really well for the best possible coverage. Oh well, live and learn I guess.

After all the cutting in was completed it was time to move on to the rolling. Easy, right? Hehehe… okay, so the rolling was rather easy, except for the fact that the roller soaked up so much paint that a few areas had to be stippled with a flat brush, but I was ready to fix this and had the brush within reach. I also needed the brush to get into the small areas the roller couldn’t, and painted in those areas after stippling. What is stippling, you ask? Simply put, it is taking the tip of, say, a 4” flat brush that is at least half an inch thick and gently dotting the surface to blend the paint drips away. This usually creates the same effect as rolling. Just be careful that you are only lightly dotting the surface and not pushing all the way through, but then again, if you do, it can just be painted over. No biggie.

So last night I got the first coat done, as it took a lot longer for the primer to dry over all of the Loony Tunes characters than originally anticipated, probably because of the gross wetness that has been our spring so far. This made me incredibly sad to have to say goodbye, mostly to Marvin the Martian. We were hoping to have the paint and at least the backer board in place by yesterday, but alas, perhaps today will be the day. And maybe tile too.

Tuesday, March 30, 2010
Half Bath Renovation: The Decision
Sometimes, talking to a professional helps. It is especially helpful if the ruling is in your favor.
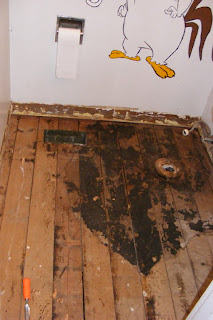


After breakfast, my partner and I went down to Coco’s Fine Tile & Marble to talk to Vanessa and possibly an installer who would be able to point us in the right direction as far as installing underlayment securely before tiling. The installers were all out, but one would be back that afternoon, so instead we talked about our tile choice, natural multicolored slate, and were looking around the store talking about future remodel stuffs… like granite countertops.
About twenty minutes after we got there, an installer was back, and my partner immediately began asking him questions. We informed him of our plans to put down slate tile, told him about our decking subfloor, and about the one area that sags a little when you walk on it. His solution? Mark the ½” concrete backer board where the joists are, trowel thinset onto the decking and attach the backer board over that, screwing it into the joists to secure it all. Apparently applying the thinset between the decking and the backer board will not only help level the floor to eliminate the small saggy area, but also act as a barrier between the wood, which expands and contracts, and the backer board, which does not. This means my idea will, in theory and according to the professional, work.
So we bought the thinset he recommended along with a trowel and some fiberglass tape to connect the adjoining pieces of concrete backer board. We also decided to pick out a paint color, as the current Loony Tunes characters that adorn the walls will not be staying. It seemed like we looked at color after color and didn’t like anything we say, mostly because they all seemed too dark or way too contrasting. Finally my partner asks the people at the paint counter their opinion. And the color I picked out that I thought went well, but was rather dark, is the one the lady said went really well. My partner didn’t see it until the lady showed him to look at it from a forty-five degree angle, and sure enough, all the green tones in the tile shone through. But, I really like the gold color he chose, so maybe we can use that in the laundry room, kitchen, or both when those get redone. Damn it… now I wish we had chosen that color instead, or gotten both. Oh well, we made the decision, and if we like it, will probably use it for the full bath too since the plan is for all the fixtures, sinks and toilets to be the same. If we don’t, well, then, uh-oh.

Monday, March 29, 2010
Half Bath Renovation: The Ongoing Battle
Last night as we are crawling into bed, my partner suggests we finish the half bath that has been torn up and unusable since last summer, and I agree. Arguing ensues as to the best possible way to do it, as is usually the case when we have opposing ideas, and we go to bed deciding it will just never get done.
My partner wants to install so much underlayment that it will raise the tiled floor of the half bath, and eventually the laundry room, kitchen and full bath an inch above the wood floor. I want to find a solution that will allow the floors to be as close to level to prevent people from tripping and possibly causing loss of life or limb simply on the quest to pee. Let the most logical choice win.
I understand that the floor needs to be level, that much is a given when installing tile in order to prevent cracking. But I don’t see how installing subfloor over the decking will help with this matter when the subfloor also isn’t level and has a few areas where it gives a little when walked upon. Simply throwing concrete backer board on top of that will not make it any sturdier than just screwing it directly into the decking. Of course, this means we will have to pull out all of the subfloor everywhere we plan to tile.
The other issue that arises during this dilemma is if we do put the concrete backer board on top of the subfloor and then the tile on top of that, it will create a one inch height difference above the rest of the floors in the house. For some, this seems like a minor issue, but most trips and falls occur from about a half an inch discrepancy. Another thing to consider is that from a resale standpoint, having that raised surface will limit the buying pool, as people with mobility issues and the elderly will be excluded.
So, I’m certain we will end up going to a tile store and ask for professional advice, as we still need thinset and grout, and go from there. I’m sure if we do need to install a subfloor first, we would be able to get away with a thinner one and also a thinner concrete backer board, but honestly, I’d think the thicker backer board that we have would be more stable, and just find a way to easily shore up the couple spots where the floor bows slightly. We’ll see whose idea wins… and probably end up putting linoleum back on.
My partner wants to install so much underlayment that it will raise the tiled floor of the half bath, and eventually the laundry room, kitchen and full bath an inch above the wood floor. I want to find a solution that will allow the floors to be as close to level to prevent people from tripping and possibly causing loss of life or limb simply on the quest to pee. Let the most logical choice win.
I understand that the floor needs to be level, that much is a given when installing tile in order to prevent cracking. But I don’t see how installing subfloor over the decking will help with this matter when the subfloor also isn’t level and has a few areas where it gives a little when walked upon. Simply throwing concrete backer board on top of that will not make it any sturdier than just screwing it directly into the decking. Of course, this means we will have to pull out all of the subfloor everywhere we plan to tile.
The other issue that arises during this dilemma is if we do put the concrete backer board on top of the subfloor and then the tile on top of that, it will create a one inch height difference above the rest of the floors in the house. For some, this seems like a minor issue, but most trips and falls occur from about a half an inch discrepancy. Another thing to consider is that from a resale standpoint, having that raised surface will limit the buying pool, as people with mobility issues and the elderly will be excluded.
So, I’m certain we will end up going to a tile store and ask for professional advice, as we still need thinset and grout, and go from there. I’m sure if we do need to install a subfloor first, we would be able to get away with a thinner one and also a thinner concrete backer board, but honestly, I’d think the thicker backer board that we have would be more stable, and just find a way to easily shore up the couple spots where the floor bows slightly. We’ll see whose idea wins… and probably end up putting linoleum back on.
Saturday, March 13, 2010
Paint
So the possibility of going to the hardware store and buying paint to finally paint the bedroom happened again last night. Of course, then the morning comes and that idea goes out the window.
When we moved into our house a little over 12 years ago, we painted all the walls white because they had obviously been exposed to a chainsmoker, as tar literally oozed and crept down the walls. Gross? Yes. Did we wash off the tar stains before painting? That’d be a big no. I’m not sure what we were thinking other than maybe the fact that I was 20 and my partner was 21, so the prospect of a thought process more than likely didn’t occur.
Now, after multiple rooms have been painted, and some need another color because while Burnt Mandarin looks good on the paint chip, an entire room of orange can be a little much for some people. I love it, but my partner hates it. So this room needs another color, the bathroom is in desperate need of a new paint job, preferably after we scrape off all the paint chipping away from the ceiling, which is really the only place it needs paint, the half bath should probably get painted before we install the slate tile floors (yes, this still has not progressed any further than my original post on the matter), and our bedroom, which is in need of a coat or two of Kilz. The kitchen and laundry room can wait until we redo the floors in there.
As I am writing this, I notice some paint chips from Lowe’s sitting next to me, and it got me thinking. We haven’t decided on a color. We can’t agree on practically anything except a color scheme of green, burgundy and gold, which I made a bedspread with those colors years ago, and am really wishing I would have made it a little less, uh, interesting. I really like the two different fabrics, one of which is solid stripes of gold, green and burgundy that is on either side of the spread, and the other is a baroque floral print with the same colors that makes up the part that lays on top of the bed, but part of me wishes I would have done one or the other. And the solid jacquard burgundy taking the position of the floral print on the reverse side didn’t look so good actually on the bed as it did in my head. I’m sure the lighting plays a factor into that, as well as those stark white walls, against which, everything looks a little off. Perhaps a duvet should be next on my “to sew” list. I’m not a stickler for exact matching paint to fabrics in a room, but a color that is close or in the same family is high on my priority. My partner just wants the room to feel warm… and wants to install mirrored closet doors. At this point, having lived without closet doors for three years now, I’m beginning to agree.
When I painted the craft room, I had picked out a fabric to make a huge bed spread for the futon that would look more like a sofa while in that position, and from that, decided I wanted a golden tan color for the walls to pick up and complement the print, as well as the new black-brown cabinet and side table and stainless steel desk I had just picked up from IKEA. This room probably would still be a drab mess if my partner’s sister wasn’t going to be staying with us for a week that year. And really, that was just an excuse to spend a bunch of money to give the craft room a makeover. In reality, it only cost about $300 for the wall cabinet, side table, desk, file cabinet, fabric and batting to make the comforter, as well as a desk and floor lamp and new light fixture to replace the old ceiling fan, and of course, paint for the walls and trim. And all of that really makes me want to paint the bedroom.
Perhaps after I make some homemade biscuits and gravy, we’ll head over to the hardware store… maybe even Restoration Hardware on 23rd in Portland… and check out paint. Then again, if we do get paint, it’ll probably just be Valspar from Lowe’s or evil Behr from Home Depot. I say evil because it seriously should not take two coats of tinted primer and five top coats to paint a room that still looks like it could use a couple more coats. Then again, this is that Burnt Mandarin color in the office my partner so wants to paint over before the color of insanity drives him to that point.
When we moved into our house a little over 12 years ago, we painted all the walls white because they had obviously been exposed to a chainsmoker, as tar literally oozed and crept down the walls. Gross? Yes. Did we wash off the tar stains before painting? That’d be a big no. I’m not sure what we were thinking other than maybe the fact that I was 20 and my partner was 21, so the prospect of a thought process more than likely didn’t occur.
Now, after multiple rooms have been painted, and some need another color because while Burnt Mandarin looks good on the paint chip, an entire room of orange can be a little much for some people. I love it, but my partner hates it. So this room needs another color, the bathroom is in desperate need of a new paint job, preferably after we scrape off all the paint chipping away from the ceiling, which is really the only place it needs paint, the half bath should probably get painted before we install the slate tile floors (yes, this still has not progressed any further than my original post on the matter), and our bedroom, which is in need of a coat or two of Kilz. The kitchen and laundry room can wait until we redo the floors in there.
As I am writing this, I notice some paint chips from Lowe’s sitting next to me, and it got me thinking. We haven’t decided on a color. We can’t agree on practically anything except a color scheme of green, burgundy and gold, which I made a bedspread with those colors years ago, and am really wishing I would have made it a little less, uh, interesting. I really like the two different fabrics, one of which is solid stripes of gold, green and burgundy that is on either side of the spread, and the other is a baroque floral print with the same colors that makes up the part that lays on top of the bed, but part of me wishes I would have done one or the other. And the solid jacquard burgundy taking the position of the floral print on the reverse side didn’t look so good actually on the bed as it did in my head. I’m sure the lighting plays a factor into that, as well as those stark white walls, against which, everything looks a little off. Perhaps a duvet should be next on my “to sew” list. I’m not a stickler for exact matching paint to fabrics in a room, but a color that is close or in the same family is high on my priority. My partner just wants the room to feel warm… and wants to install mirrored closet doors. At this point, having lived without closet doors for three years now, I’m beginning to agree.
When I painted the craft room, I had picked out a fabric to make a huge bed spread for the futon that would look more like a sofa while in that position, and from that, decided I wanted a golden tan color for the walls to pick up and complement the print, as well as the new black-brown cabinet and side table and stainless steel desk I had just picked up from IKEA. This room probably would still be a drab mess if my partner’s sister wasn’t going to be staying with us for a week that year. And really, that was just an excuse to spend a bunch of money to give the craft room a makeover. In reality, it only cost about $300 for the wall cabinet, side table, desk, file cabinet, fabric and batting to make the comforter, as well as a desk and floor lamp and new light fixture to replace the old ceiling fan, and of course, paint for the walls and trim. And all of that really makes me want to paint the bedroom.
Perhaps after I make some homemade biscuits and gravy, we’ll head over to the hardware store… maybe even Restoration Hardware on 23rd in Portland… and check out paint. Then again, if we do get paint, it’ll probably just be Valspar from Lowe’s or evil Behr from Home Depot. I say evil because it seriously should not take two coats of tinted primer and five top coats to paint a room that still looks like it could use a couple more coats. Then again, this is that Burnt Mandarin color in the office my partner so wants to paint over before the color of insanity drives him to that point.
Subscribe to:
Posts (Atom)


